Remote Learning Close Reading Using Google Jamboard
Before we jump into how you can use Google Jamboard for close reading during remote learning, let me ask you this: are you familiar with close reading? Essentially, close reading is a strategy to help students better understand what they read. When students are close reading, they read a text several times in order to better understand what the text says and its purpose. Students better understand what they read each time they read it.
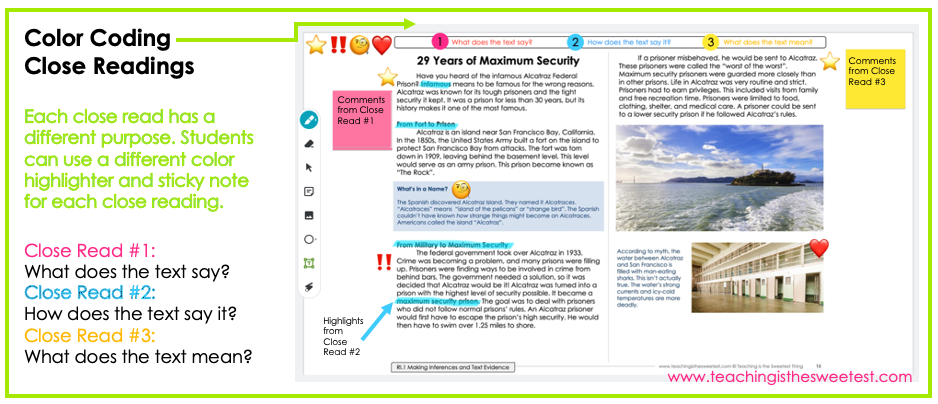
Close reading also involves annotating the text. As students read, they mark key details, important vocabulary, and other aspects of the text. Close reading has sometimes been called “reading with a pencil”.
You may be wondering how on earth students could possibly “read with a pencil” digitally during remote learning.
Enter Jamboard! Jamboard is essentially a digital whiteboard. It is the PERFECT tool to use for annotating text during close reading.
Follow these 4 steps to have your students close read digitally during remote instruction.
1: INTRODUCE THE JAMBOARD TOOLS.
Explain to your students that Jamboard is a digital whiteboard. Give them a quick demo of what the platform looks like. Help them open one up on their screen. Then, just like you would when passing out new math manipulatives for the first time, give your students time to explore a few of the tools in Jamboard just for fun. Check out this simple guide to getting started with Jamboard to learn more about them for yourself.
2: SELECT AND SET UP CLOSE READING ANNOTATIONS.
Before you begin utilizing Jamboard for close reading with your students, you’ll need to plan out exactly how you want to use it.
Different teachers have different preferences about the close reading annotations they want their students to use. Do you want your students to mark the important parts? Do you want your students to highlight key vocabulary? Choose which annotations you’d like your students to utilize, and set up a template.
If that feels overwhelming, don’t sweat it. You can grab a FREE close reading annotations template to get started with. After you download it to your Google Drive, keep scrolling, and you’ll learn some shortcuts needed to create your own template so that you can modify it to fit your needs.
Ready to create your own version of the close reading annotations template shared above?
You’ll learn how to upload and embed the passage in a Jamboard in the next section, but first, let’s go through how to create draggable emojis.
Create a text box, then type an emoji in. How do you type an emoji? You need to pop the emoji keyboard up!
On a Mac, you can do this by hitting control + command + space bar then select your emoji.
On a PC, you can do this by hitting the Windows logo key + . (period) then select your emoji.
Once you create the text box, change the size. Select the text box, then use the menu bar at the top of Jamboard to change the size of the emoji.
Once you’ve got it sized as you want it, copy and paste a few times.
Then, drag the copied items to stack on top of each other. Students will be able to easily drag items from this stack to mark up the text.
Repeat this for as many emojis as you’d like for students to be able to use.
3: CHOOSE THE TEXT & UPLOAD IT TO JAMBOARD.
Once you’ve decided on the annotations you’d like to use and set up the template, it’s time to choose the text you want your students to practice with. There’s an entire library of differentiated reading passages on social studies and science topics that you can start with that are perfect for integration. You can also check out this library of high-interest, seasonal passages.
After you’ve selected your text, you’ll need to set it as the background of your Jamboard. In order to do this, you’ll need to create an image of the text. There are several ways to do this:
Passages in Adobe PDF: Take a screenshot of the passage to save it as an image.
On a PC, a quick Google search with the name of your computer model and the keyword “screenshot” should help you find it. Most PCs have built-in tools to take screenshots, but the process for utilizing the tool varies from model to model.
On a Mac, you can do this by pressing shift + command + 4 to open the capture cursor. Click and drag to create a screenshot. The screenshot will automatically be saved to your desktop as an image file.
Passages in Google Slides: Within Google Slides, hit “File”, then “Download”, and finally click “JPEG image”. Save the JPEG to your computer.
Once you have the image version of the text, you’re ready to set it as your background in Jamboard.
**If you want to use the annotation template you set up earlier, be sure to make a copy of the template Jamboard and follow the rest of the steps WITHIN that template document.**
Hit the button on the menu bar at the top labeled “Set background”.
Select your image file, and voila!
This will in essence lock the passage in the background of the Jamboard so that students don’t accidentally move it around while they’re adding annotations, highlights, and comments.
4. ALLOW STUDENTS TO RESPOND & COLLABORATE.
Once your Jamboard is set up and ready for students, it’s time to share with students so they can begin reading! Consider your ultimate goal for the lesson in order to answer the following questions:
A - Do you need to share the document with one student, a small group of students, or the whole class?
B - Will you use the Jamboard to model close reading? Or, will you use the Jamboard to allow students to practice directly with the text?
For modeling, you’ll change the share settings to “Viewer”.
For student practice, you’ll change the share settings to “Editor”.
Looking for more Jamboard ideas? Hop over here!


